Welcome to the ultimate Kali Linux Installation Guide and step-by-step tutorial on setting up your own Ethical Hacking laboratory! Before diving into penetration testing and cybersecurity concepts, having a safe and isolated virtual environment is essential.
In this Kali Linux Installation Guide, we will walk you through installing VMware Workstation and setting up Kali Linux step-by-step.
Note for macOS Users: This visual guide focuses on VMware Workstation (primarily for Windows). If you are using macOS, we recommend using Oracle VirtualBox as your virtualization software, though the core Kali Linux setup concepts remain very similar.
What You Will Learn
Virtualization Basics: Understanding how Virtual Machines (VMs) work and why an isolated lab is crucial for security testing.
VMware Workstation Setup: A complete walkthrough for installing and configuring VMware Workstation.
Kali Linux Installation: Step-by-step instructions for downloading, importing, and running Kali Linux smoothly.
Visual Walkthrough: Follow along with clear screenshots marked with directional arrows to make your lab setup completely error-free.
Follow the step-by-step guide below to get your penetration testing lab up and running!
Step 1: Search for VMware Workstation Player
Open your web browser (such as Google Chrome, Mozilla Firefox, or Microsoft Edge).
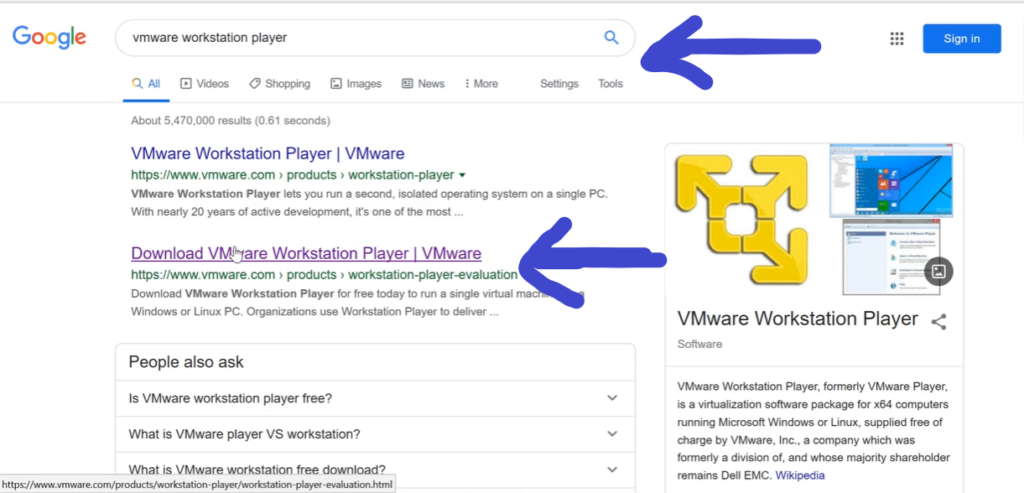
Go to Google and type “vmware workstation player” into the search bar.
Click on the search button or press Enter.
Look for the official search result titled “Download VMware Workstation Player | VMware” and click on the link to open the official download page.
Step (Alternative for macOS Users): Download Oracle VM VirtualBox
Note: If you are using macOS, you can use Oracle VM VirtualBox instead of VMware Workstation.
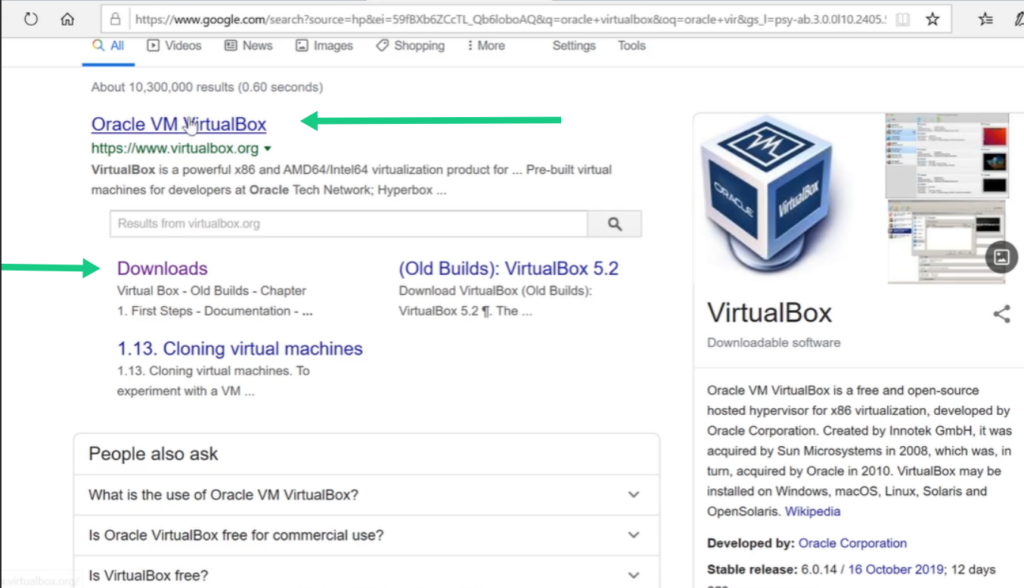
Open your browser and search for “oracle virtualbox” on Google.
Click on the main link “Oracle VM VirtualBox” or directly click on the “Downloads” sub-link to go to the official VirtualBox download page.
Step 2: Download VMware Workstation Player for Windows
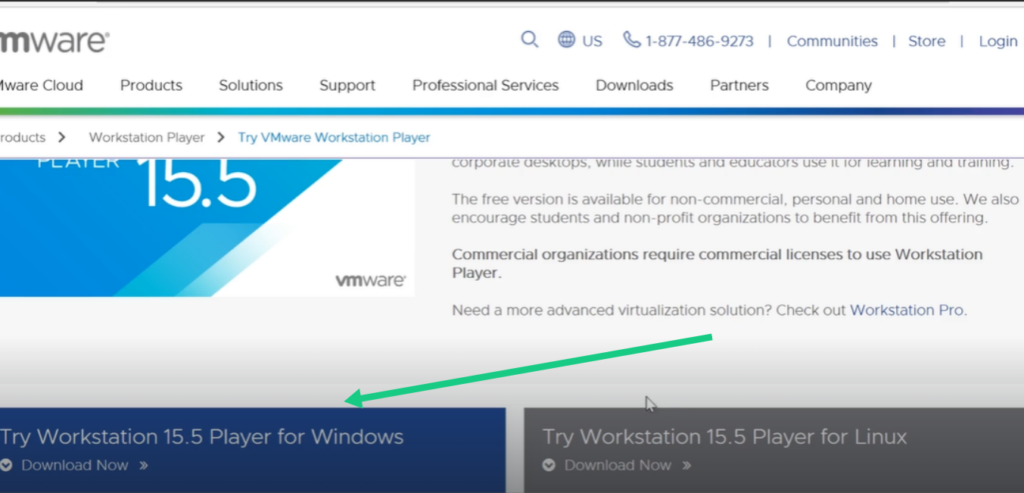
Once the VMware website opens, scroll down to the Try Workstation Player
Locate the option titled “Try Workstation 15.5 Player for Windows” (or the latest available version).
Click on the Download Now link under the Windows option to start downloading the setup file to your computer.
Step 3: Configure Setup Options & User Experience Settings
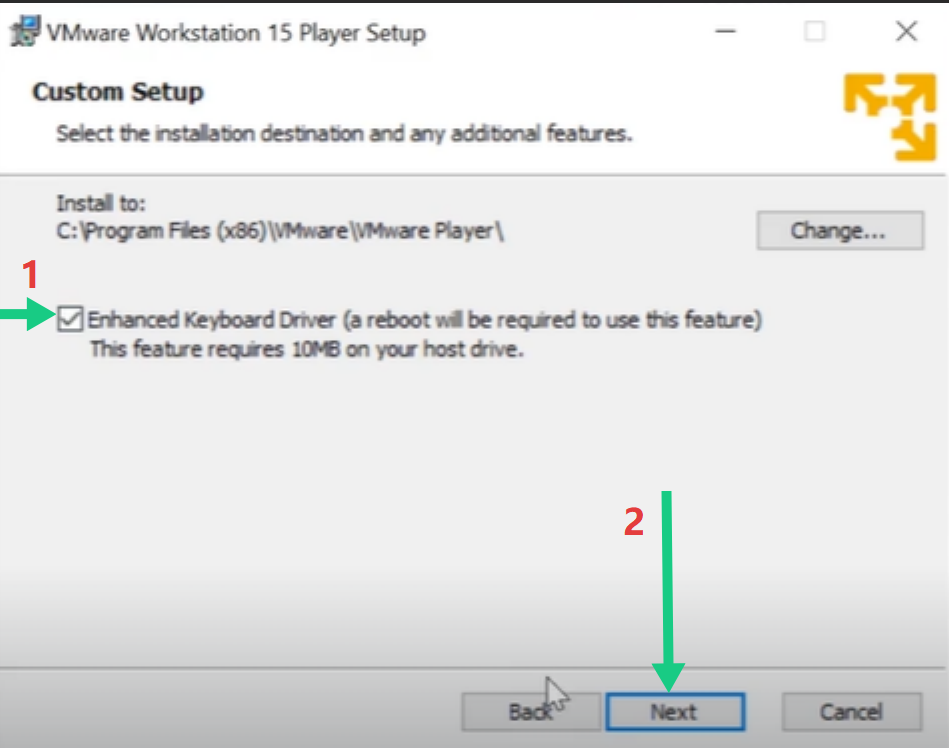
On the Custom Setup window, check the box for “Enhanced Keyboard Driver” (marked with arrow 1 in the first image) for better keyboard integration.
Click Next (marked with arrow 2) to continue.
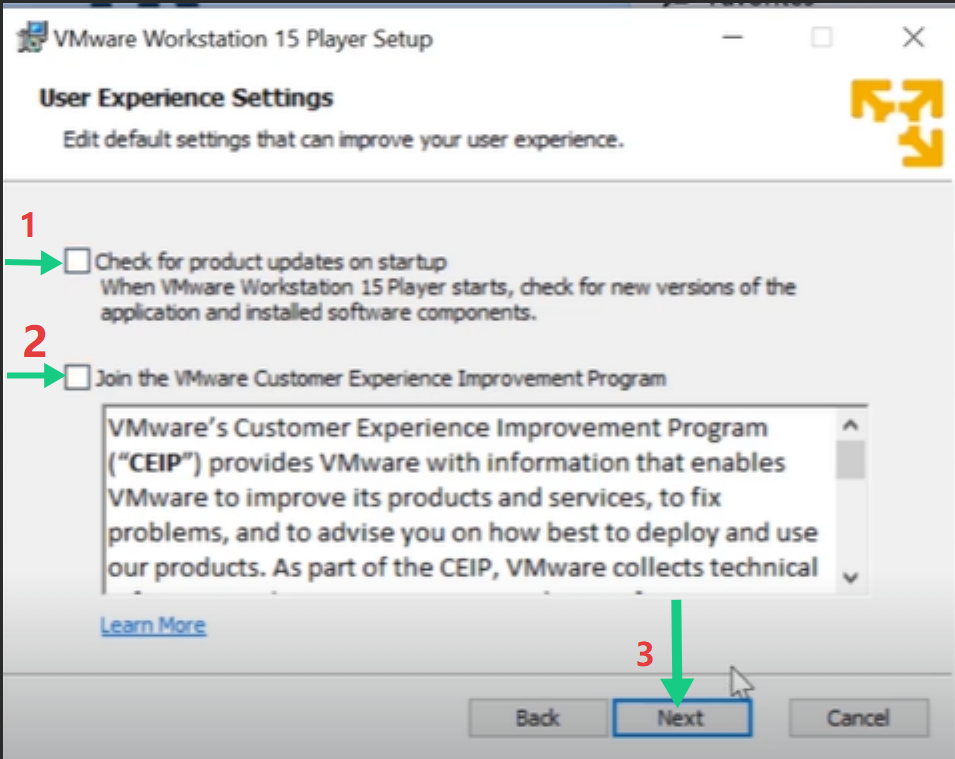
On the User Experience Settings window:
Uncheck “Check for product updates on startup” (marked with arrow 1 in the second image) if you want to manage updates manually.
Uncheck “Join the VMware Customer Experience Improvement Program” (marked with arrow 2 in the second image).
Click Next (marked with arrow 3) to move forward with the installation.
Step 5: Restart Your System to Complete Setup
Instructions
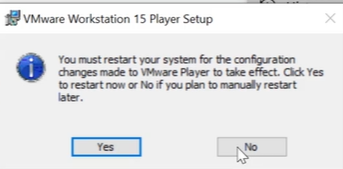
After completing the setup, a prompt will appear informing you that a system restart is required for configuration changes (such as the Enhanced Keyboard Driver) to take effect.
Click Yes to restart your computer immediately, or click No if you prefer to save your ongoing work and restart manually later.
Alternative Section: Installing Oracle VM VirtualBox (For macOS Users)
Instructions
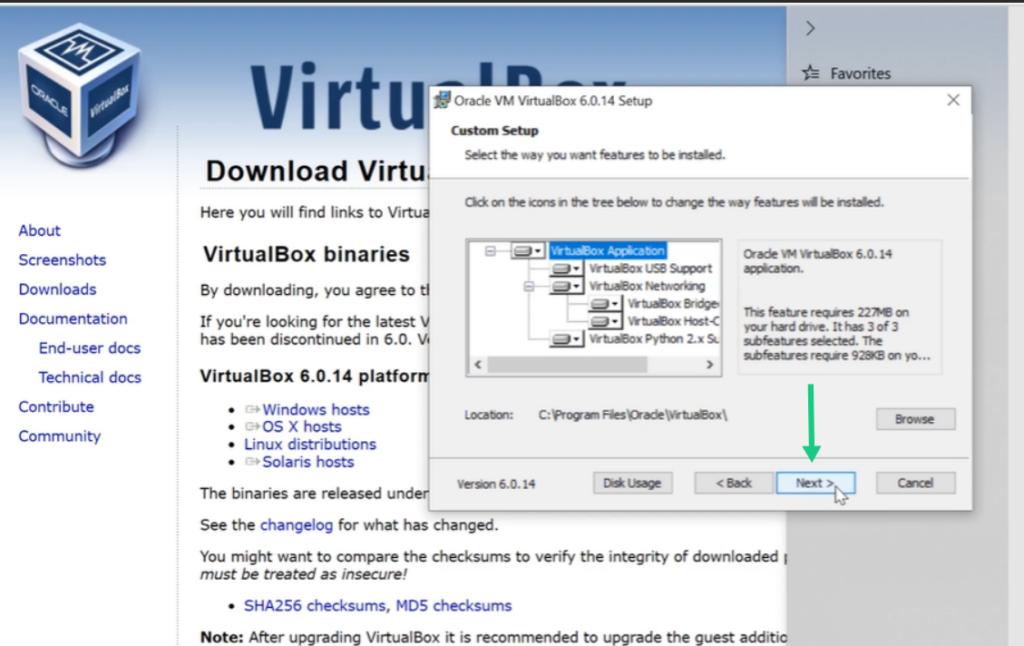
Launch Setup: Run the downloaded installer file to open the Oracle VM VirtualBox Setup wizard, keep the default feature selections on the Custom Setup window, and click Next (indicated by the arrow in Image 1).
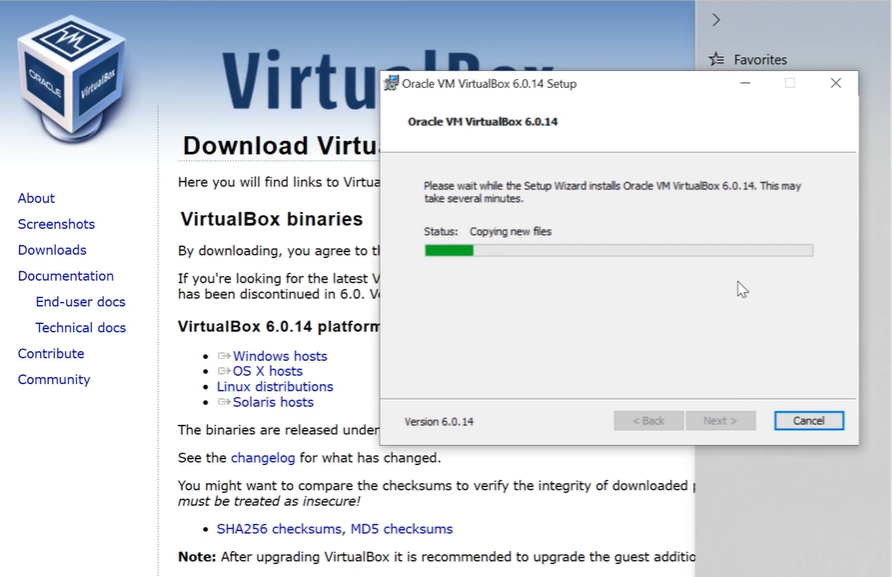
Begin Installation: Click Install on the readiness prompt and wait a few moments while the setup wizard copies the required files to your system (Image 2).
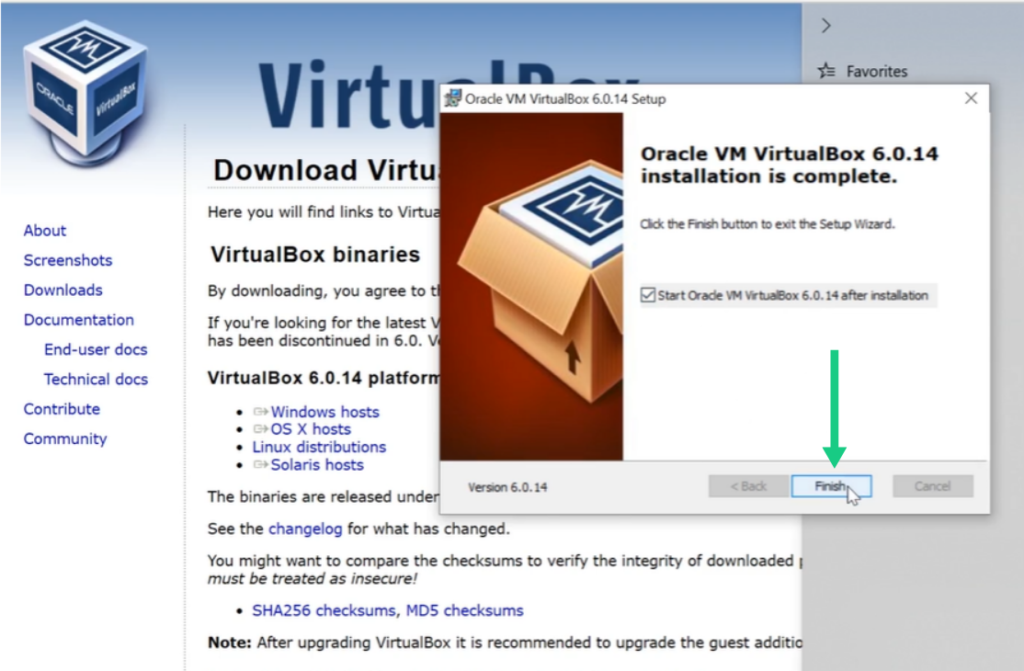
Finish Setup: Once complete, check the box “Start Oracle VM VirtualBox after installation” and click the Finish button (indicated by the arrow in Image 3) to close the wizard.
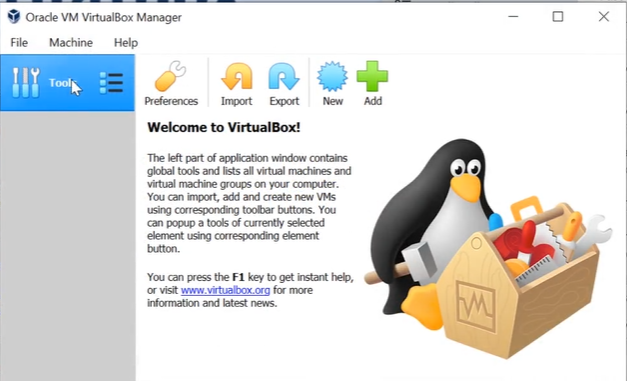
Launch Application: The Oracle VM VirtualBox Manager interface will open (Image 4), confirming that VirtualBox is successfully installed and ready to run your virtual machines!
Step 6: Launch VMware Workstation Player & View Dashboard
Instructions
Open VMware Workstation Player from your desktop shortcut or Start Menu.
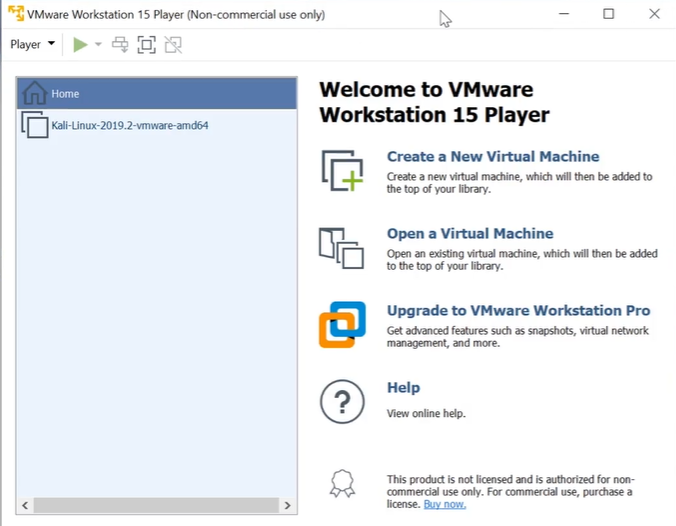
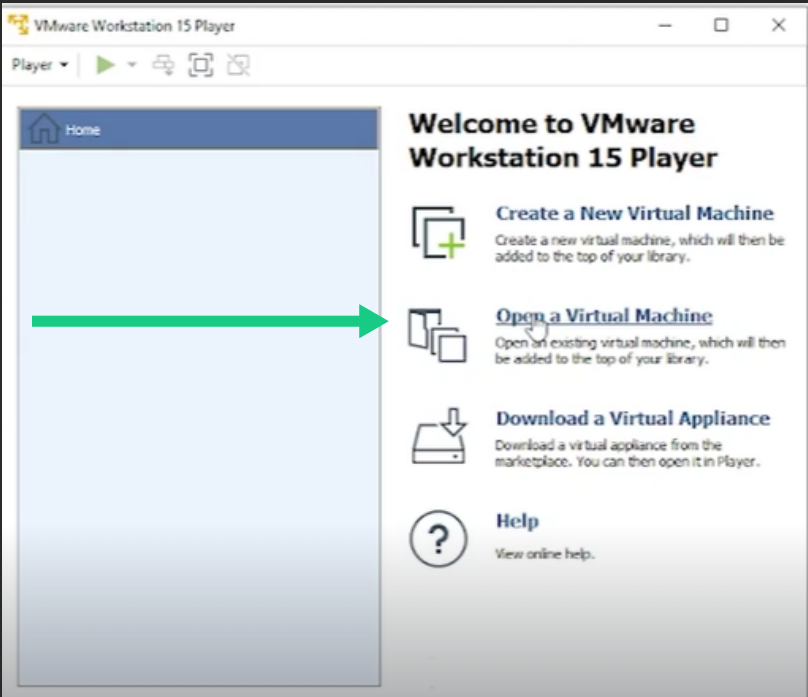
The main welcome screen will display options to “Create a New Virtual Machine” or “Open a Virtual Machine”.
If you have already imported or created a virtual machine (such as Kali Linux), it will appear in the left-hand library pane ready for use.
Part 2: Downloading & Setting Up Kali Linux
Note on Linux Distributions:Debian is widely considered the best and most stable base for Linux when it comes to ethical hacking and penetration testing. Since Kali Linux is built directly on top of Debian, it provides an optimized environment pre-loaded with essential security and penetration testing tools right out of the box.
Step 7: Search for Official Kali Linux Download
Instructions
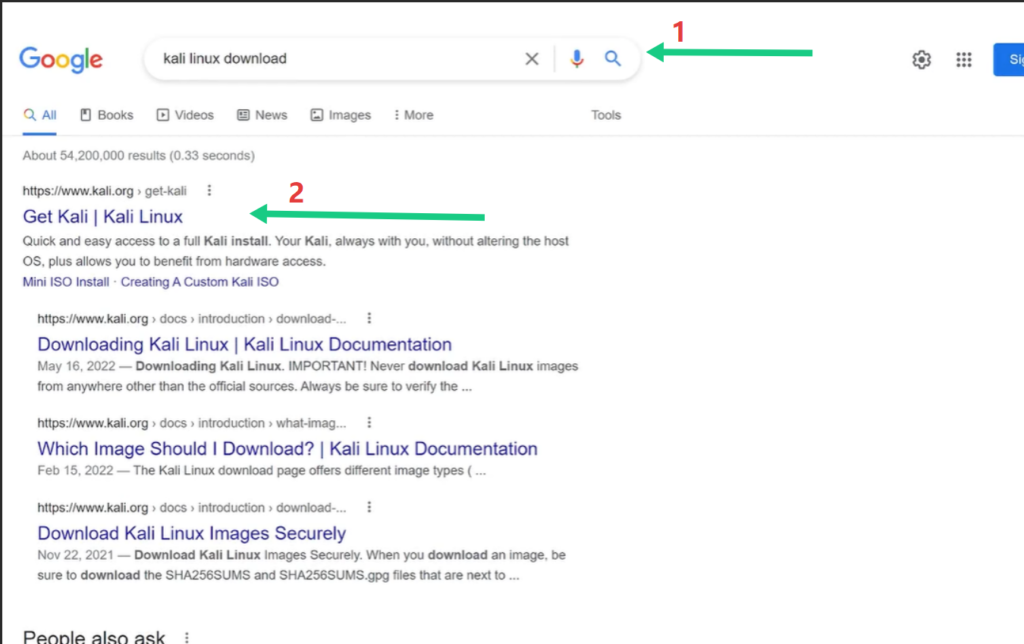
Open your web browser, go to Google, and search for “kali linux download” (marked with arrow 1).
Press Enter or click the search icon.
From the search results, click on the official link “Get Kali | Kali Linux” (org/get-kali) (marked with arrow 2).
Step 8: Select Virtual Machine Platform & Download Kali Image
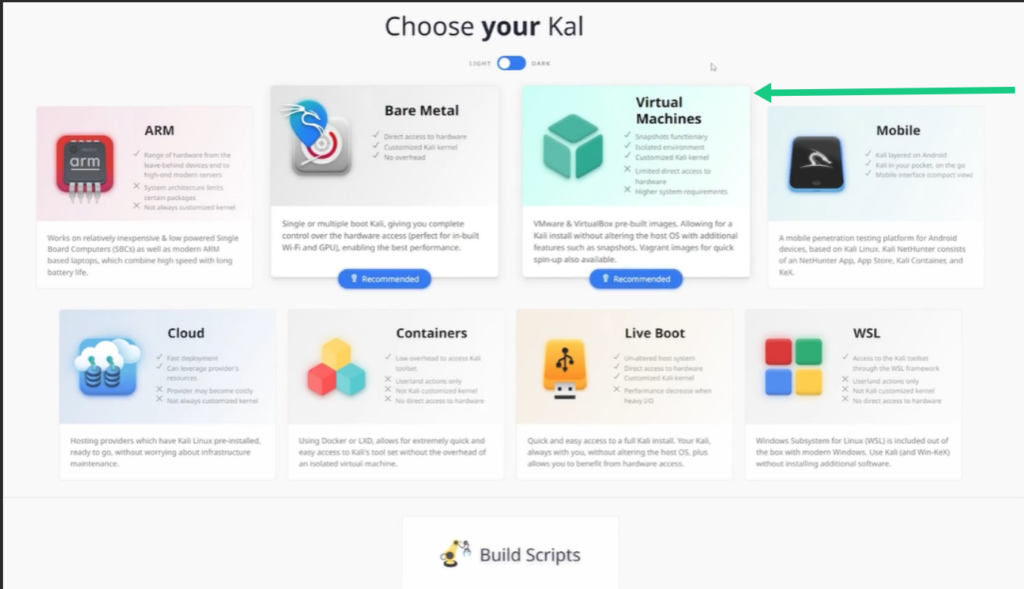
On the Get Kali page, locate the platforms section and click on the Virtual Machines card (indicated by the arrow in Image 1).
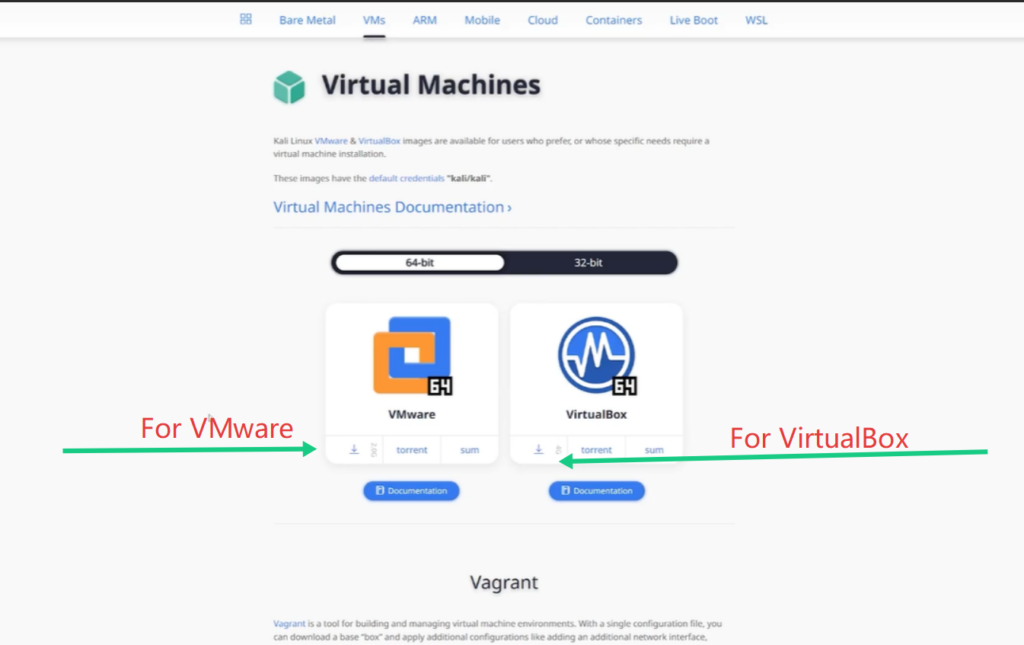
You will be redirected to the pre-built Virtual Machines download section (Image 2).
Select your architecture (default is 64-bit) and download the appropriate image for your software:
For VMware Workstation (Windows): Click the download button under the VMware card (indicated by the left arrow).
For Oracle VirtualBox (macOS): Click the download button under the VirtualBox card (indicated by the right arrow).
Step 9: Install 7-Zip & Extract Kali Linux Image
Note on File Archiving: If you prefer not to download the Kali Linux image directly from the main link, you can download it via the 7-Zip (.7z) archive option. Please note that both download options ultimately yield the same compressed file format, which requires 7-Zip (or a compatible archive utility) to extract before launching in VMware or VirtualBox.
Instructions
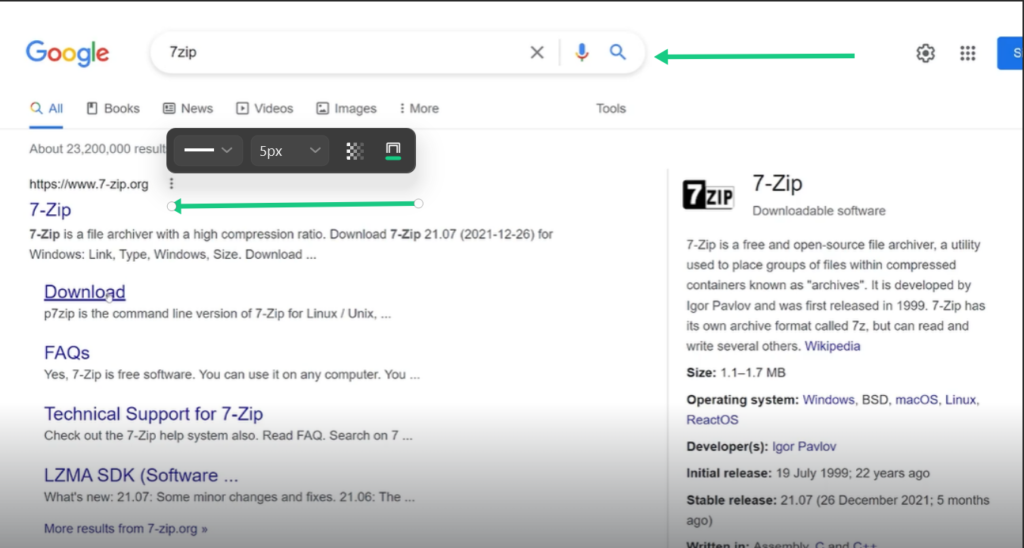
Download 7-Zip Utility: Open your browser, search for “7zip”, and navigate to the official website (7-zip.org) (Image 1).
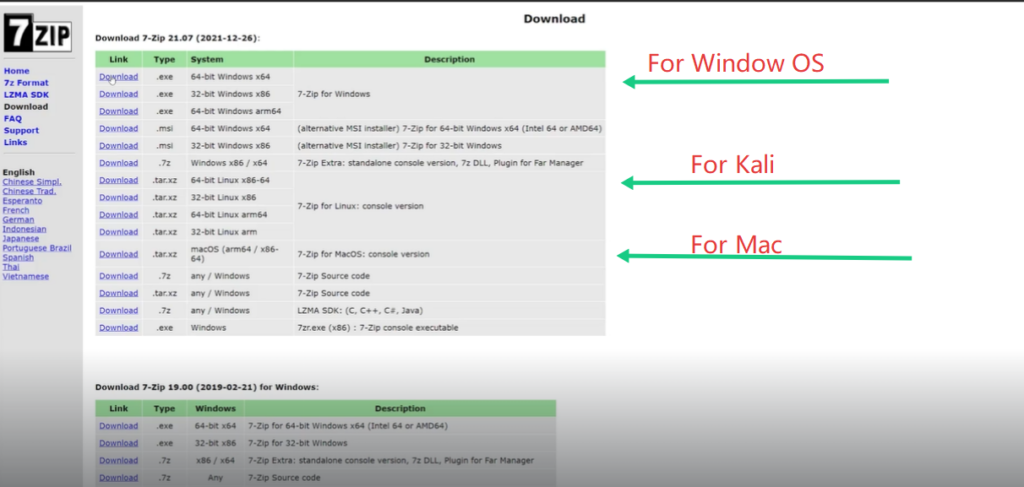
Select Software Installer: On the downloads table, select and download the setup installer for your operating system (e.g., 64-bit Windows x64, Linux, or macOS) (Image 2). Install 7-Zip once downloaded.
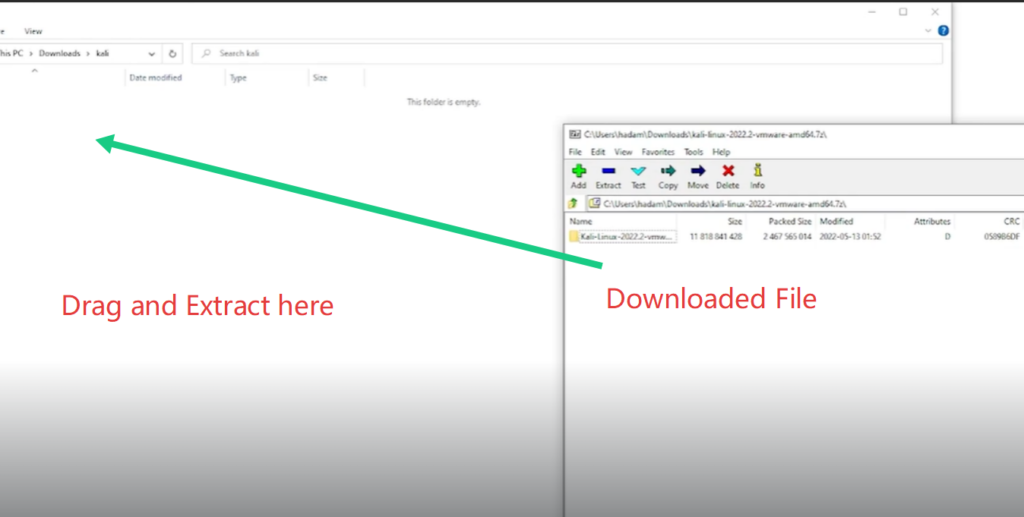
Extract Compressed File: Open the downloaded Kali Linux .7z archive using 7-Zip. Drag and drop or extract the compressed contents into your preferred local folder (Image 3).
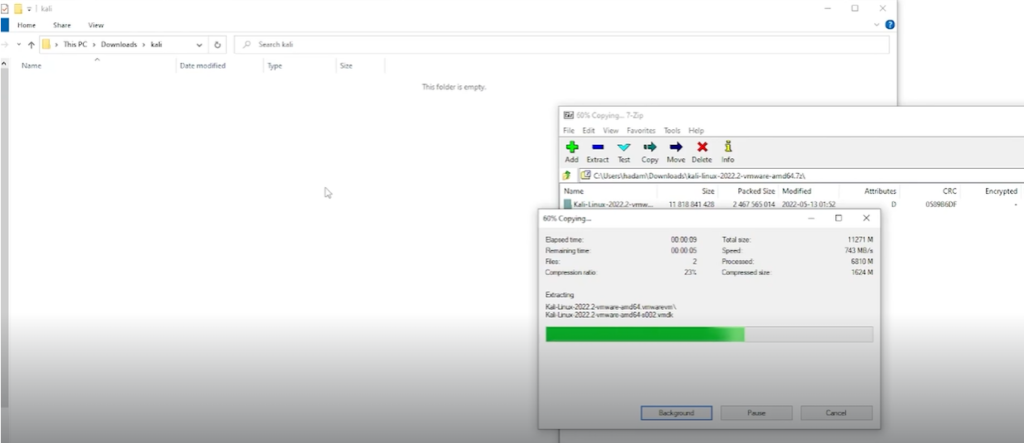
Monitor Extraction: Wait for the extraction progress bar to finish unpacking the virtual machine files (Image 4).
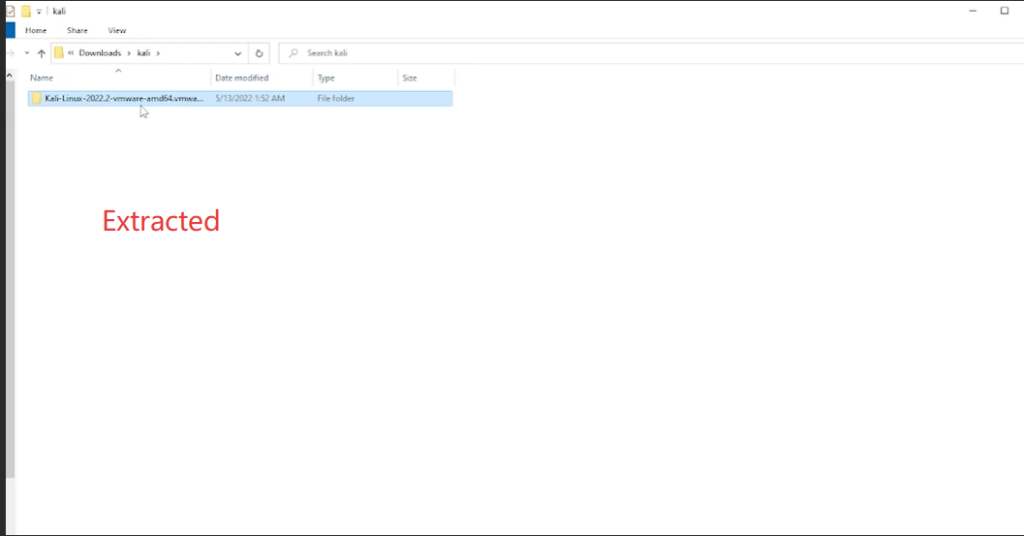
Verify Extracted Folder: Once extracted, double-click to open the newly generated Kali Linux folder in File Explorer (Image 5).
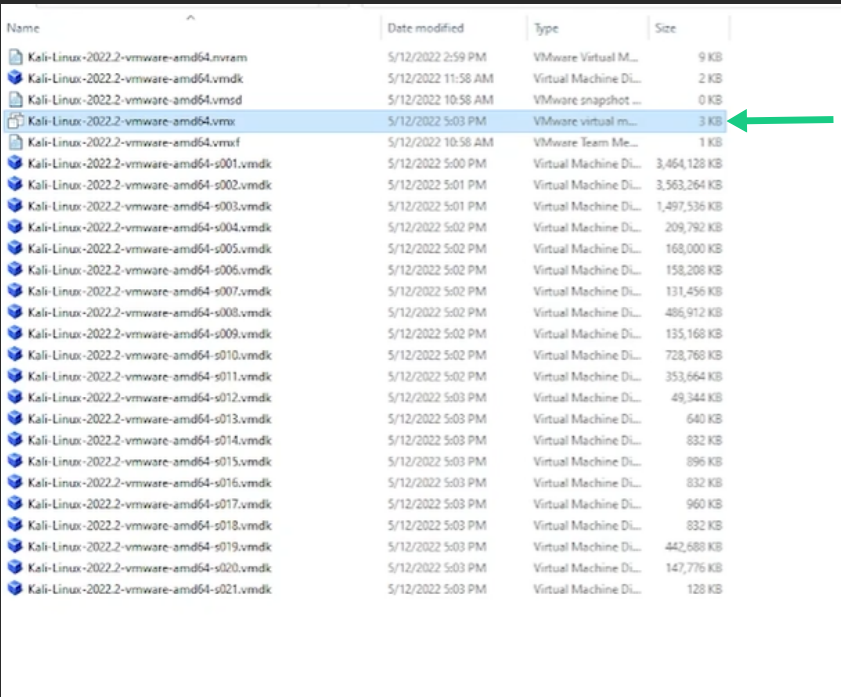
Inside the extracted Kali Linux folder, browse through the list of files to locate the .vmx configuration file (e.g., Kali-Linux-2022.2-vmware-amd64.vmx).
Double-click the .vmx file (indicated by the green arrow) to automatically register and open your Kali Linux virtual machine inside VMware Workstation.
Step 11: Open, Configure, and Launch Kali Linux in VMware Workstation Player
Instructions
Open Virtual Machine: Launch VMware Workstation Player, click Open a Virtual Machine (Image 1), and select the .vmx file from your extracted Kali Linux folder.
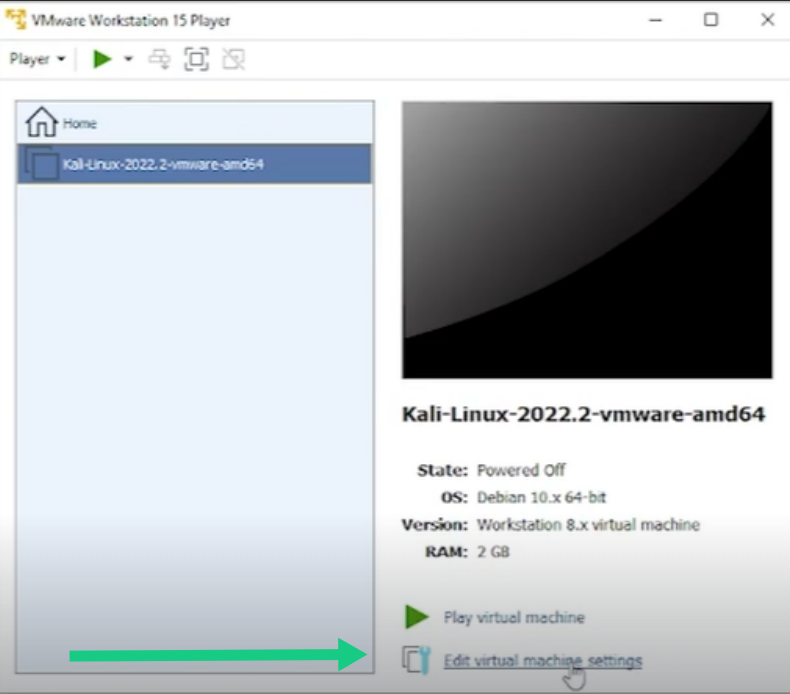
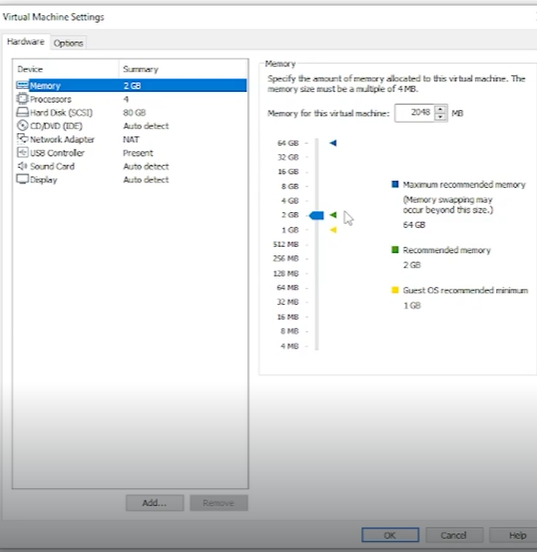
Access Settings: Select the imported VM from the left panel and click Edit virtual machine settings (Image 2).
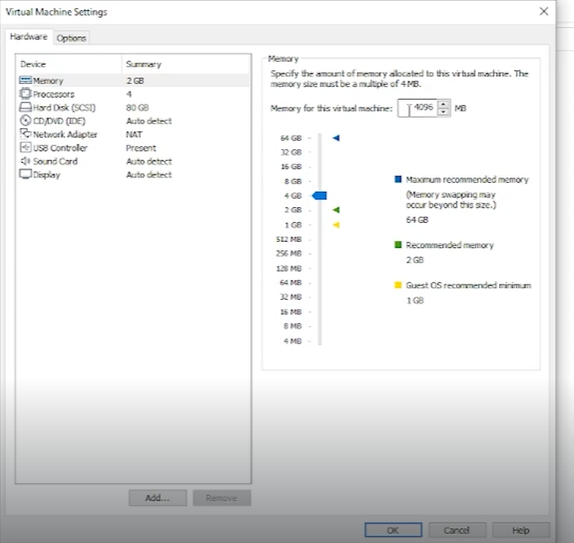
Adjust Memory (RAM): Under the Hardware tab, select Memory (Image 3) and increase the allocated RAM to 4096 MB (4 GB) or higher for optimal performance (Image 4).
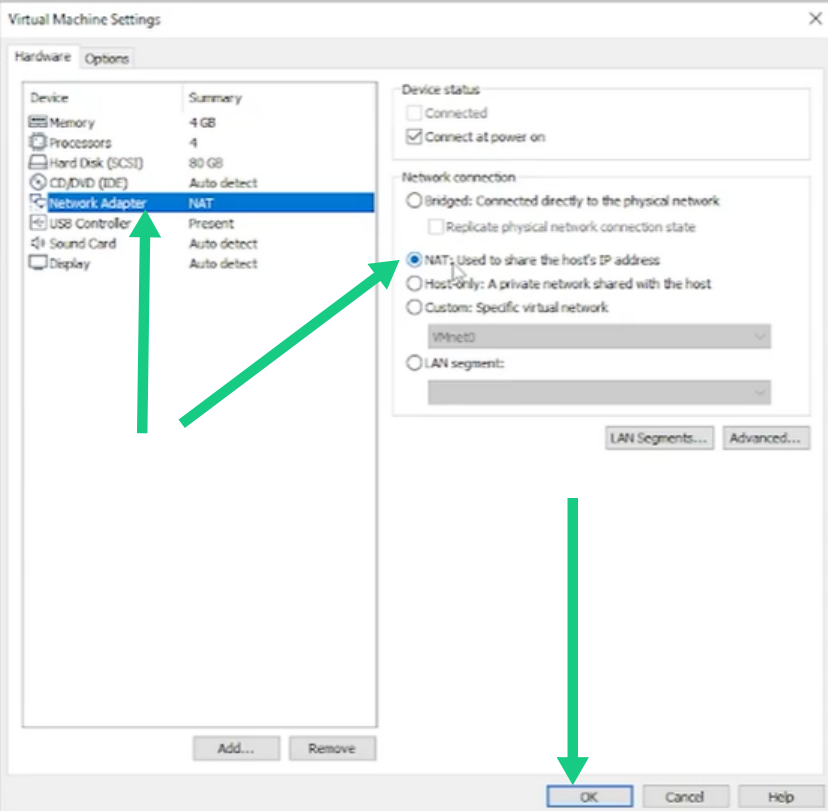
Configure Network: Click Network Adapter, set the connection type to NAT: Used to share the host’s IP address, and click OK to save changes (Image 5).
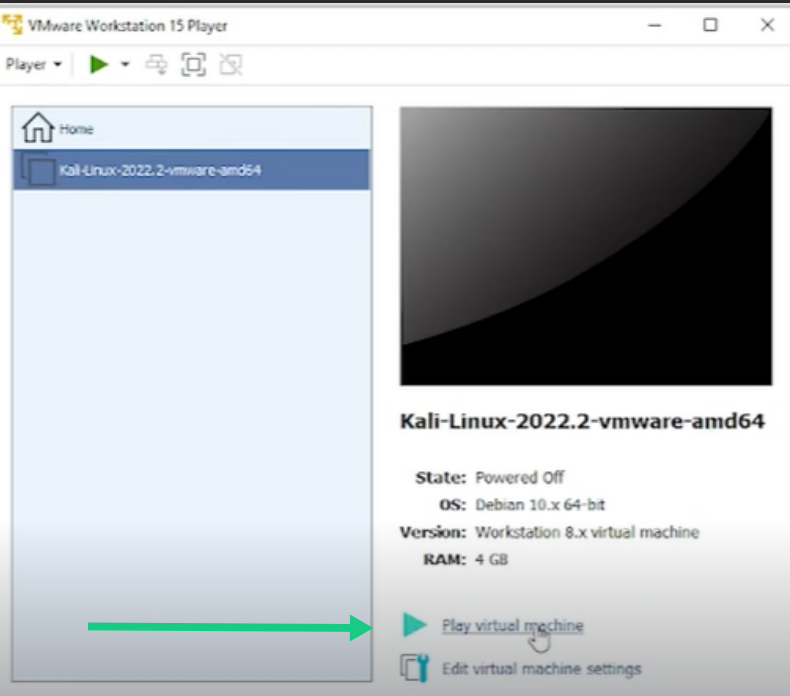
Start Virtual Machine: Click Play virtual machine (Image 6) to boot up the system.
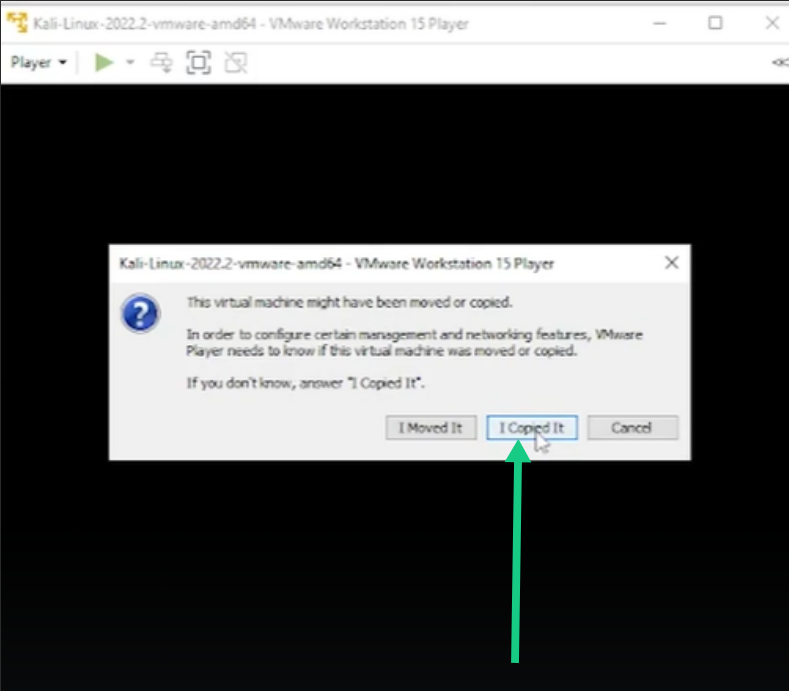
Confirm VMware Prompt: If prompted whether the virtual machine was moved or copied, select “I Copied It” (Image 7) to finalize the startup process.
Step 12: Boot and Log In to Kali Linux Operating System
Instructions
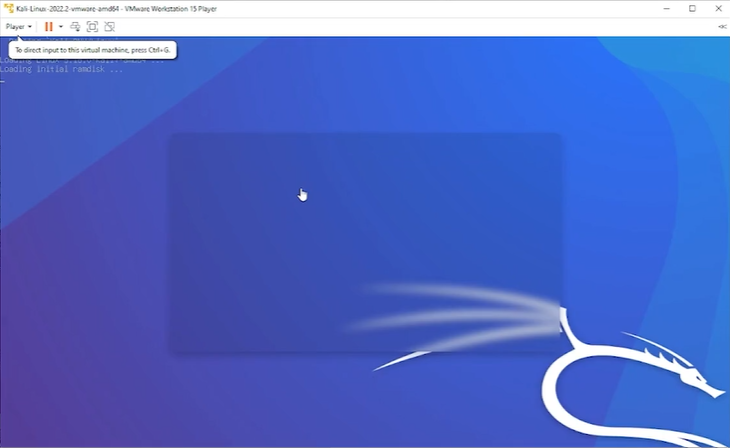
Boot Process: Allow Kali Linux to initialize its boot sequence and load system files (Image 1).
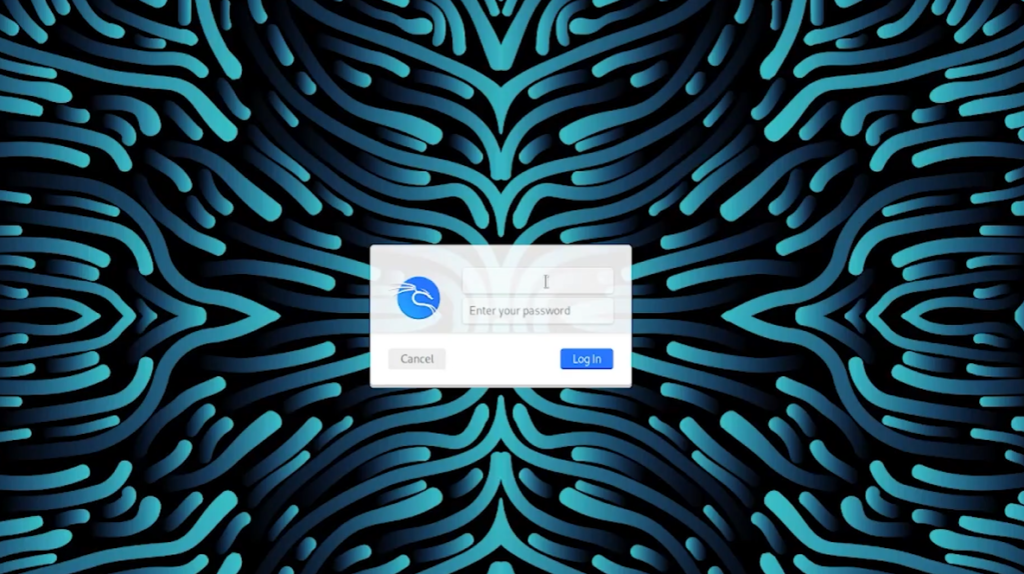
Access Login Screen: Wait until the graphical login prompt appears on your screen (Image 2).
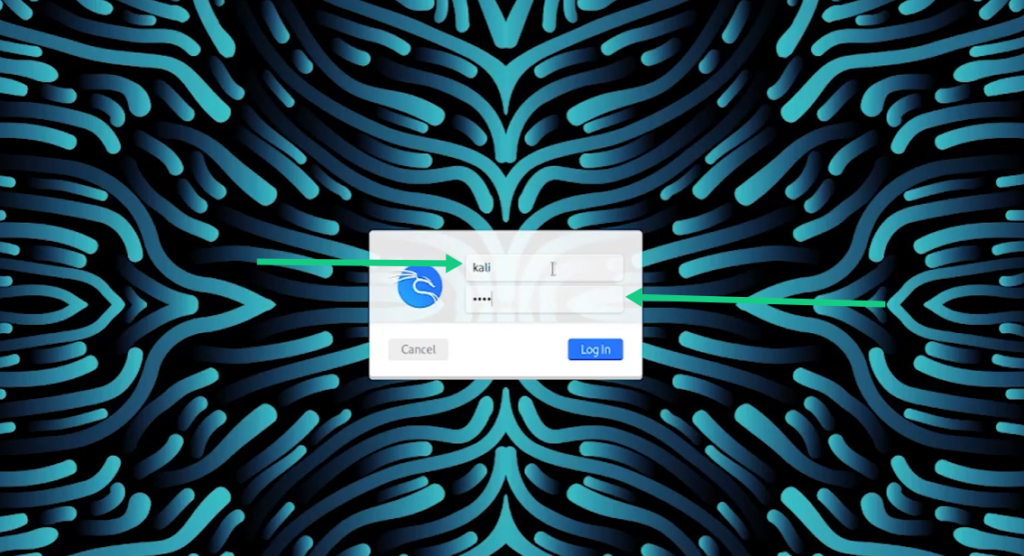
Enter Credentials: In the username field, type kali, and in the password field, type kali, then click Log In or press Enter (Image 3).
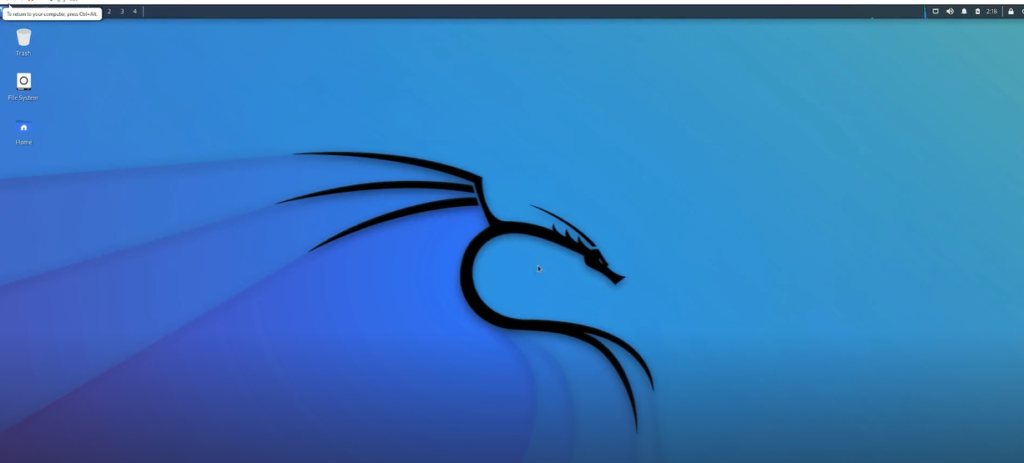
Access Desktop: Once authenticated, the default Kali Linux desktop environment will load successfully, indicating the system is ready for use (Image 4).
Final Verdict
The setup and configuration of your Kali Linux Virtual Machine on VMware Workstation Player is complete and fully functional. By importing the .vmx file, allocating adequate hardware resources (4 GB RAM with NAT networking), and logging in with default credentials (kali/kali), your isolated penetration testing and security environment is ready for operational use.