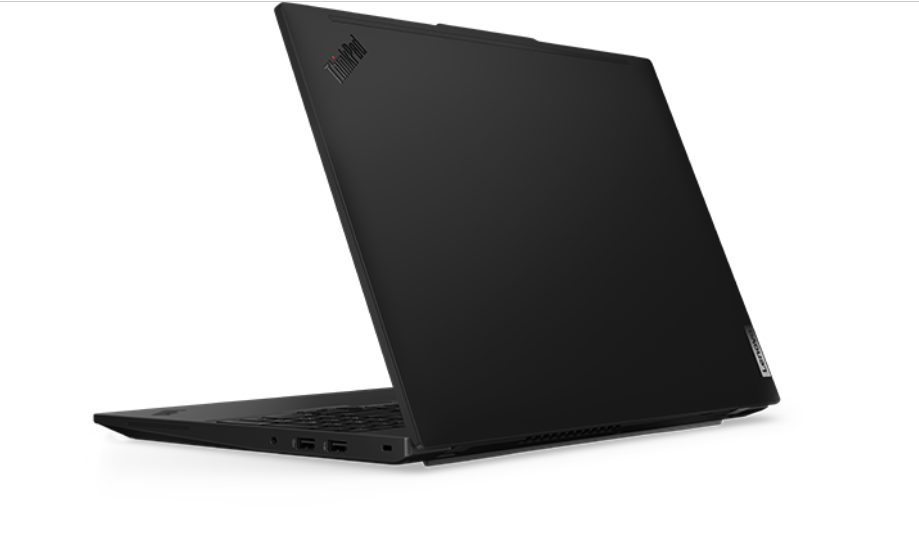
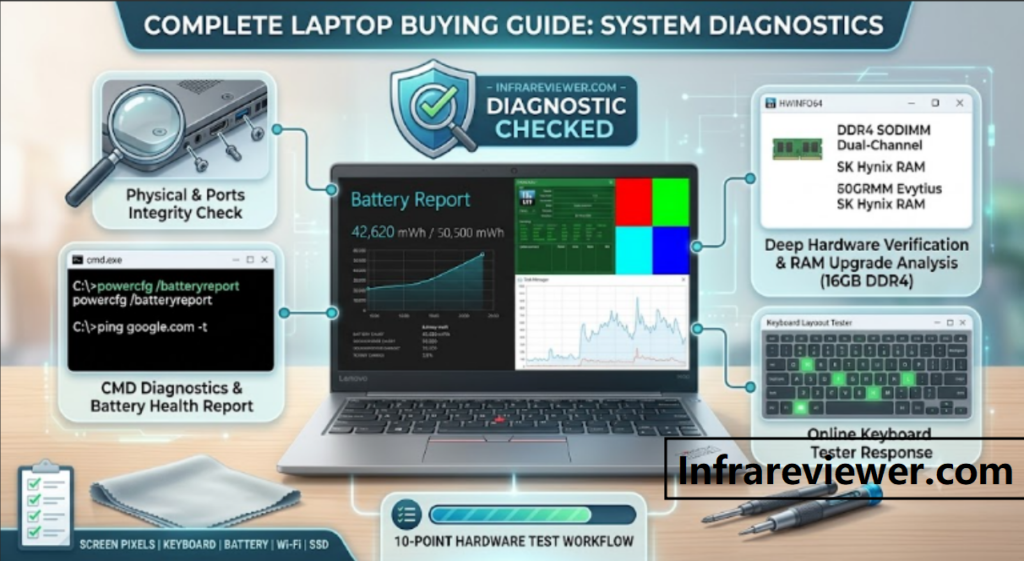
Comprehensive laptop hardware testing visual checklist and system diagnostic guide by infrareviewer.com

Ultimate Laptop Testing Guide Before Buying

Performing a thorough laptop hardware testing routine is essential before purchasing any new or used computer. Whether you are checking physical panel integrity, verifying BIOS specifications, or diagnosing internal component health, running systematic tests ensures you walk away with a 100% genuine and fully functional machine.

  • Screws & Chassis Inspection: Verifies if the laptop was previously opened or repaired, protecting internal components and cooling fans from past physical drops.
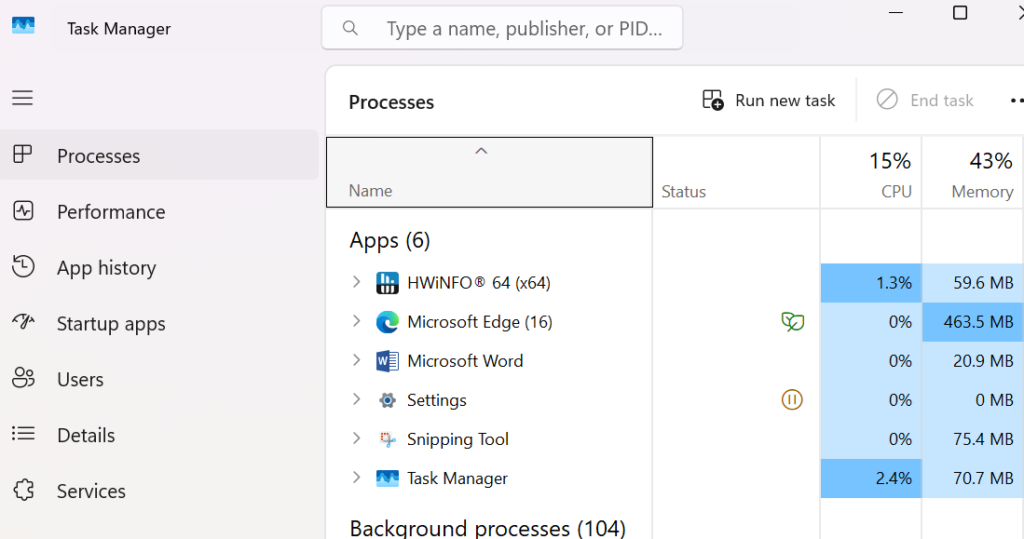
  • Task Manager Real-Time Monitoring: Checks basic live resource usage (CPU %, RAM MBs) to evaluate daily multitasking performance.
  • HWiNFO Deep Diagnostic Tool: Connects directly with Task Manager metrics to uncover hidden component specs, verifying original RAM brands, NVMe SSD read/write speeds, and motherboard details.
  • BIOS Serial Number Verification: Matches the internal system identity code against the physical chassis sticker to confirm the laptop’s original identity.
  • Screen Dead Pixel & Color Test: Scans the display panel for bright spots, light leaks, and screen damage to prevent costly display replacements.
  • Online Keyboard Testing Utility: Tests the electrical actuation and responsiveness of every physical key to guarantee smooth typing usability.
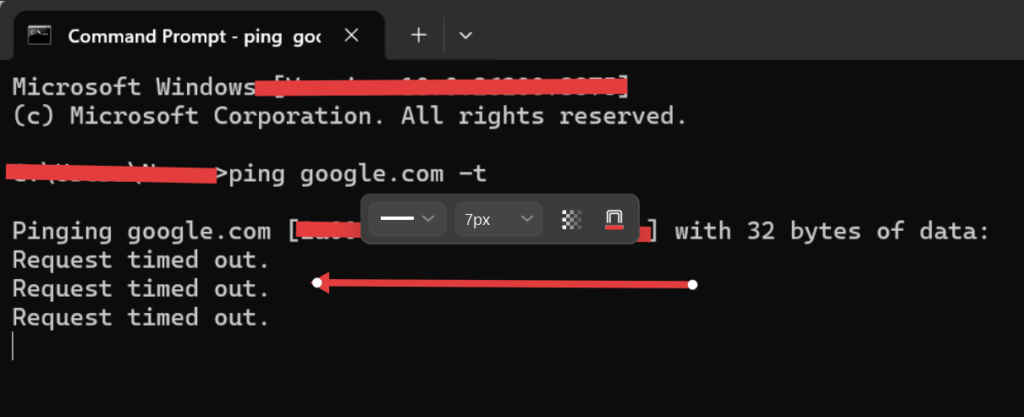
  • Wi-Fi Ping & Connectivity Test: Sends continuous data packets to detect packet loss, ensuring the wireless network card delivers drop-free internet.
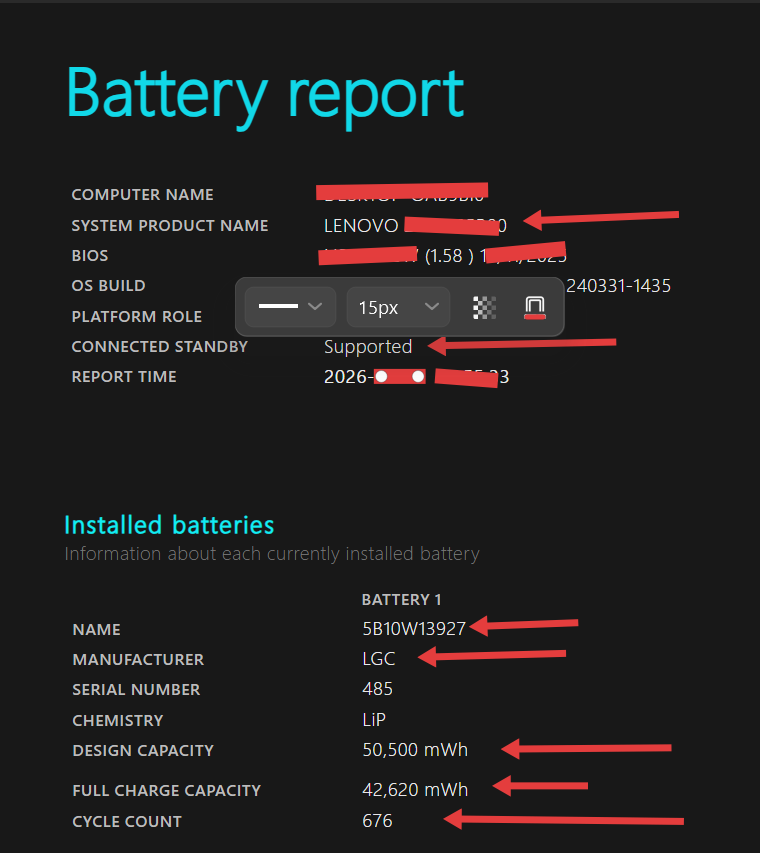
  • Command Prompt Battery Health Report: Compares Design Capacity against Full Charge Capacity to calculate exact battery degradation and cycle count.
Laptop Hardware Testing Overall Inspection Guide - InfraReviewer

Physical Body & Screw Inspection in Laptop Testing

  • Chassis & Body Condition: Examine the top cover, palm rest, and screen hinges for scratches, cracks, or dents.
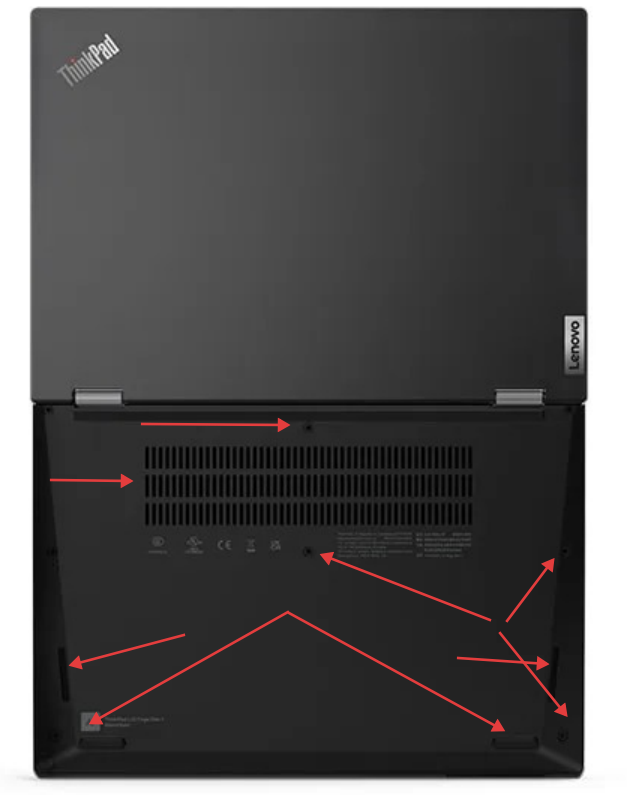
  • Screw Verification: Turn the laptop upside down and inspect the bottom cover. Ensure all screws are present, tight, and show no signs of stripped heads or tool marks, which indicate previous repairs.
  • Cooling Vents & Rubber Feet: Verify that the intake vents are clean and the rubber feet are intact to prevent overheating.
Checking laptop screws integrity and bottom cover fitment before purchase - infrareviewer.com guide

Port Connectivity & Accessory Checks in Laptop Testing

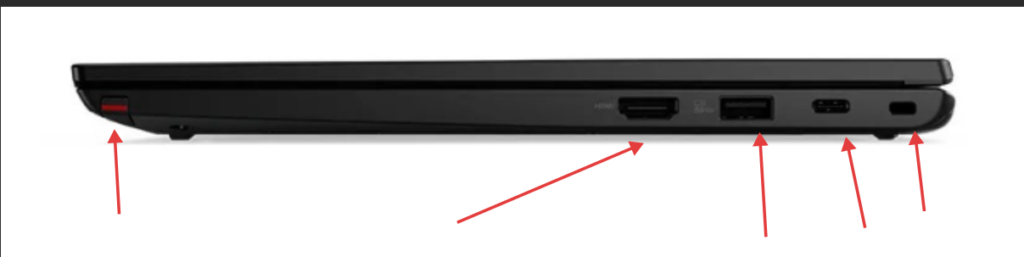
  • Port Testing: Test all side ports—including USB-A, USB-C/Thunderbolt, HDMI, SIM/microSD slots, and 3.5mm headphone jacks—by plugging in actual devices to ensure firm fitment and instant recognition.
  • Accessories & Missing Utensils: Confirm all included equipment is present, such as the original charger, stylus pen (if supported), or port adapters.
Verifying laptop left side ports functionality in comprehensive hardware test by infrareviewer.com
Testing right side USB and audio ports connectivity - infrareviewer.com laptop testing checklist

Webcam, Audio, & Thermal Performance in Laptop Testing

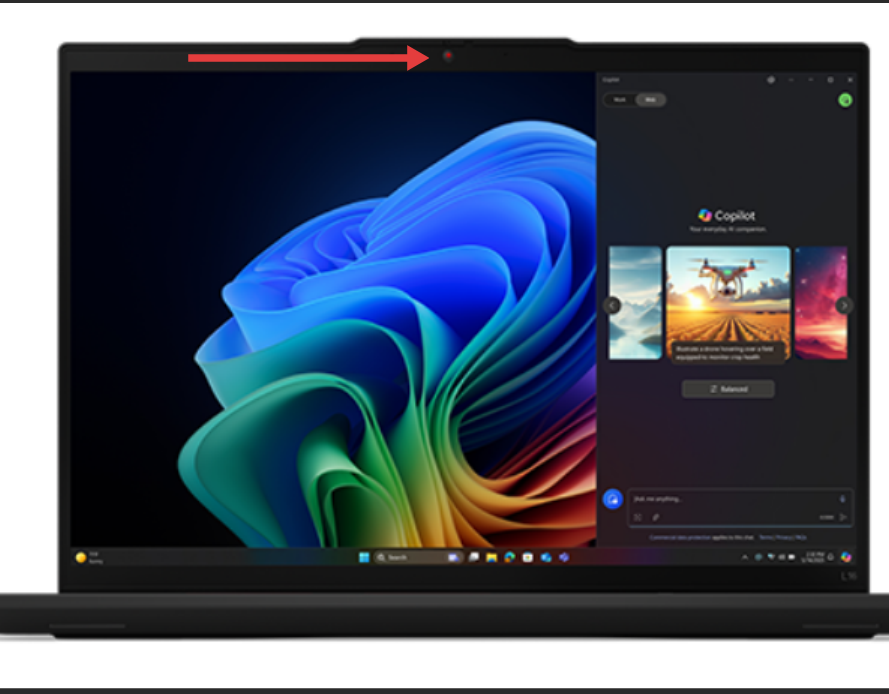
  • Webcam & Privacy Shutter: Open the camera app to verify picture clarity and check if the physical privacy shutter operates smoothly.
  • Speaker Quality: Play high-volume audio to listen for distorted or blown-out sound from the speaker grills.
  • Thermals & Heating: Run multiple tasks or stress tests to verify that internal fans kick in and the chassis does not overheat excessively.
laptop webcam and privacy shutter test infrareviewer

Inspection Point

What to Verify

Status

Screw & Body Integrity

All screws fitted, zero strip marks or casing cracks

[ ] Pass

I/O Ports & Cables

USB, HDMI, Charging, Audio ports fully working

[ ] Pass

Camera & Microphone

Clear video output and functional privacy shutter

[ ] Pass

Audio Output

Clean sound at 100% volume without crackling

[ ] Pass

Thermal Performance

Fan airflow working, no abnormal overheating

[ ] Pass

Accessories & Stylus

Original charger, pen, and modular tools included

[ ] Pass

System Specifications & Properties Inspection

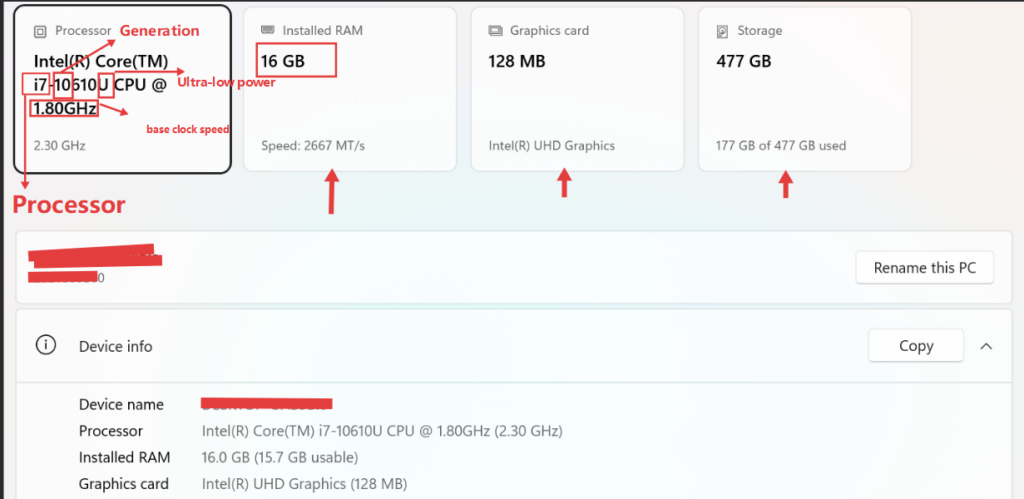
  • Processor (CPU): Represents the central processing unit model, generation, and processing performance.
  • Generation (e.g., 10th Gen): Identifies the release generation of the CPU architecture (e.g., 10th Generation).
  • Suffix (e.g., “U”): Indicates the specific processor series, where “U” represents ultra-low power consumption for better battery life.
  • Base Clock Speed (e.g., 1.80GHz): Shows the default operating frequency of the processor cores before turbo boost.
  • Installed RAM: Displays the total installed physical memory available for multitasking (e.g., 16 GB).
  • Graphics Card: Shows the dedicated or integrated GPU model and memory capacity (e.g., Intel UHD Graphics with 128 MB VRAM).
  • Storage Capacity: Displays total storage space and current disk usage (e.g., 477 GB total SSD storage).
Checking laptop CPU specs RAM and storage properties - infrareviewer.com

Software & System Diagnostics

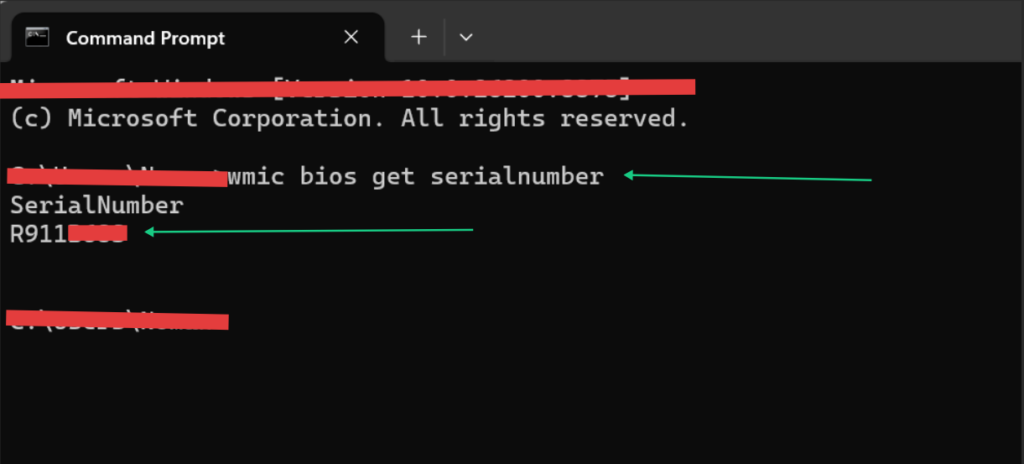
  • Serial Number Check (wmic bios get serialnumber): Command Prompt command used to verify the genuine BIOS serial number and match it with the physical chassis sticker.
Verifying laptop serial number using command prompt by infrareviewer.com

Screen & Keyboard Diagnostics Images

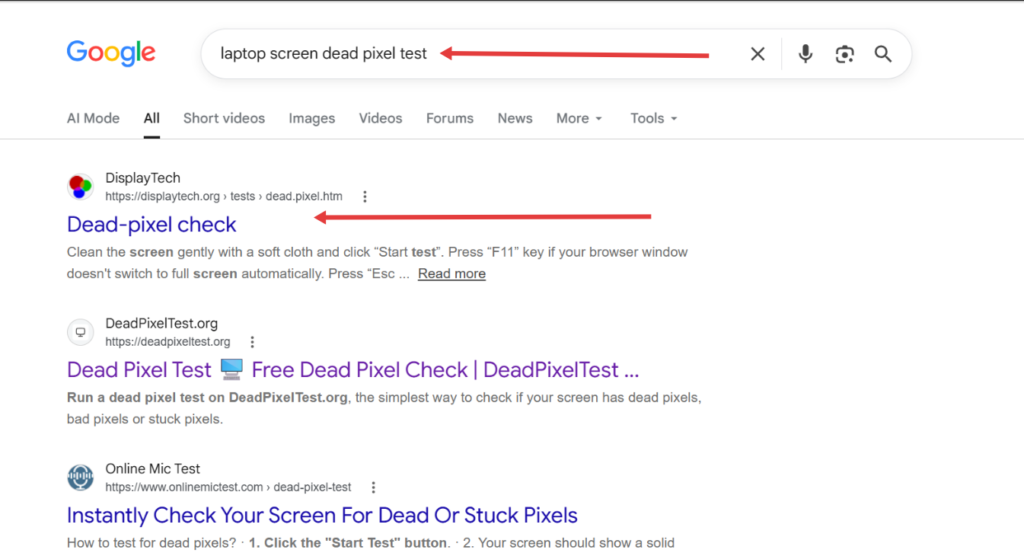
  • Dead Pixel Web Search: Google search workflow to locate a browser-based screen diagnostic tool.
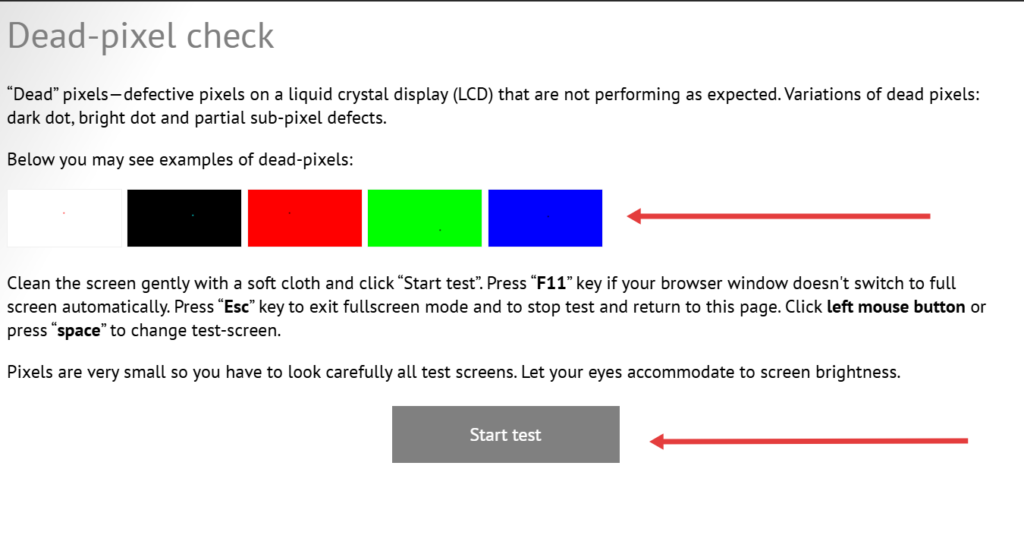
  • Dead Pixel Test Interface: Testing interface where solid color blocks are rendered to spot defective screen pixels.
  • Solid Black Screen Check: Full-screen black background test used to detect bright stuck pixels, white spots, or backlight bleeding. 
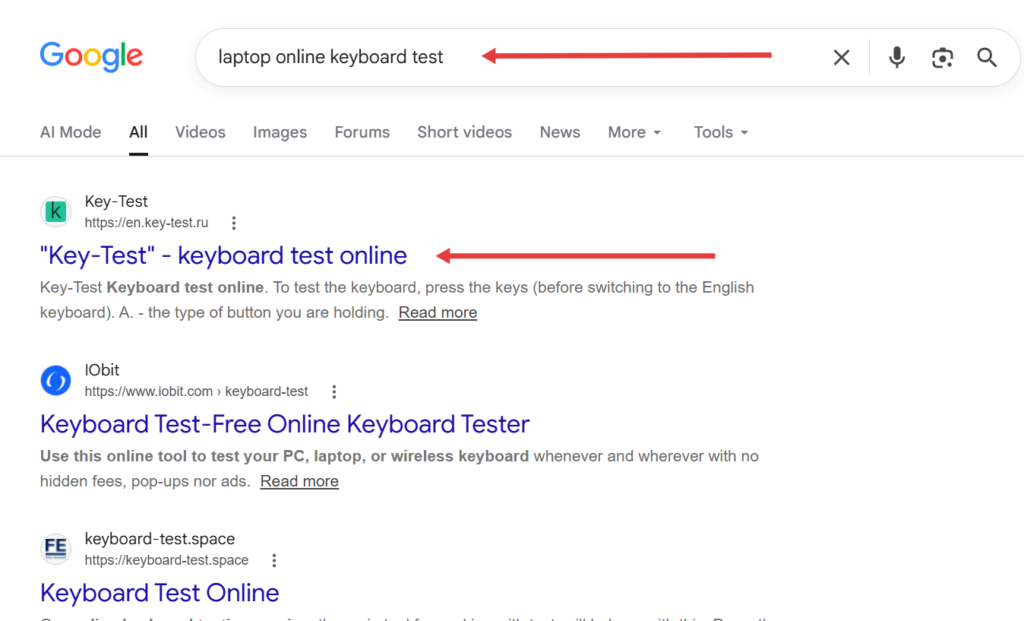
  • Keyboard Test Search: Online Google search process to open a web-based key tester utility.
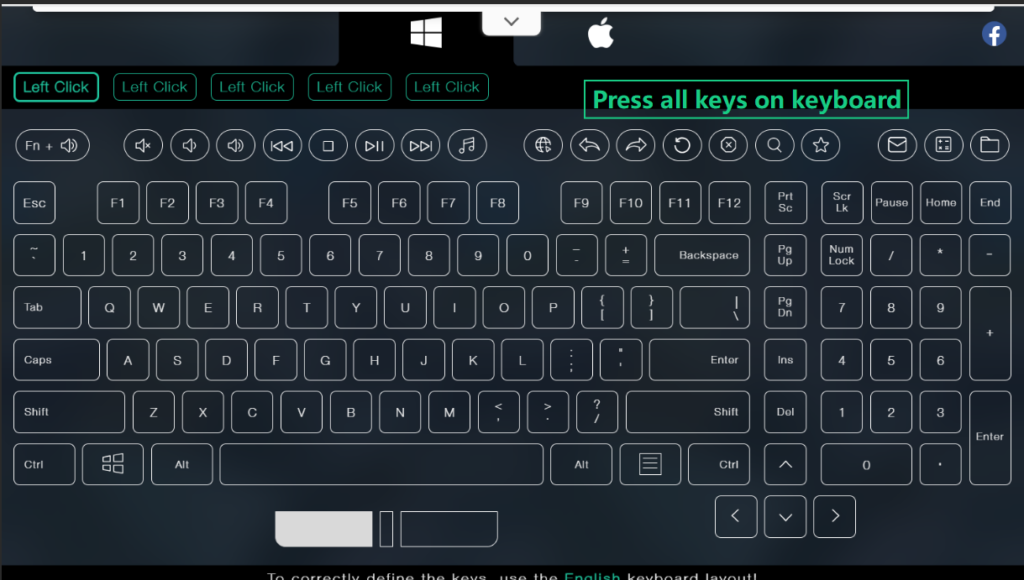
  • Online Keyboard Tester Interface: Browser tool displaying a full keyboard layout to test physical key actuations.
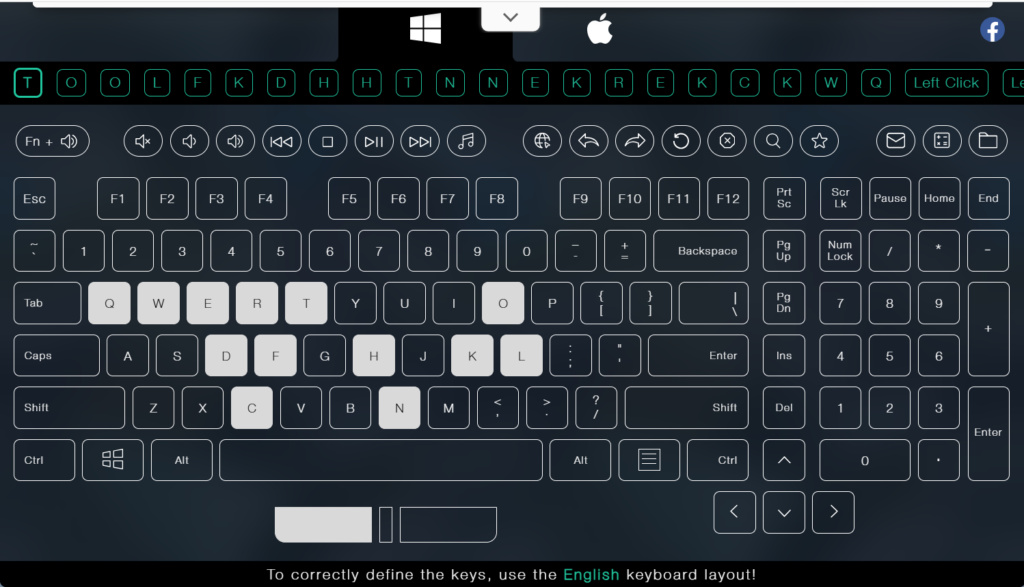
  • Keyboard Key Response (Green Highlights): Visual indication where pressed keys light up green to confirm 100% register responsiveness.
laptop screen dead pixel test by infrareviewer.com
Testing laptop display for dead pixels and color spots by infrareviewer.com
Full screen black background dead pixel check guide on infrareviewer.com
Searching online laptop keyboard hardware test tool - infrareviewer.com
laptop keyboard online test infrareviewer.com
Testing laptop keys responsiveness with green status icons on infrareviewer.com

Battery Health Diagnostics Workflow Description

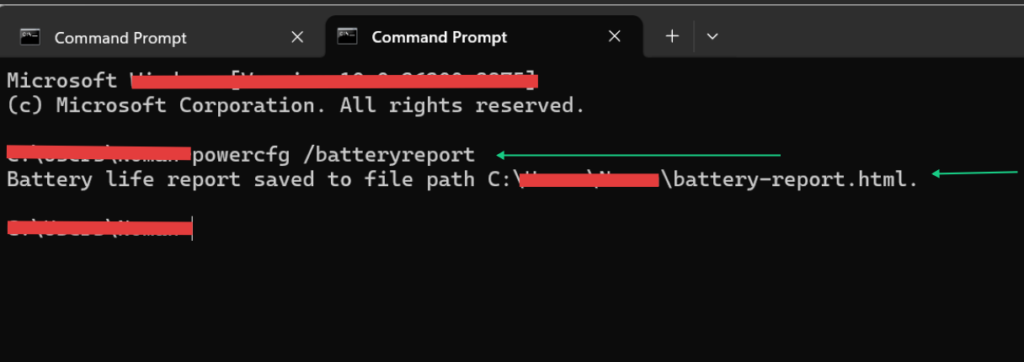
  • Battery Command Execution (powercfg /batteryreport): Command Prompt input used to trigger the built-in Windows battery health reporting utility.
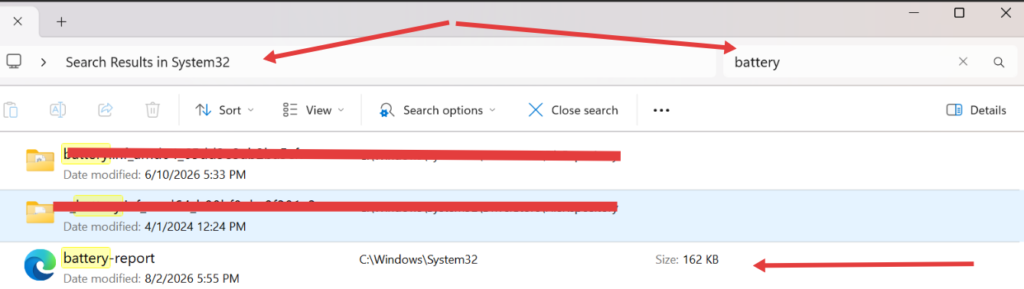
  • Report Output File Path: Generates and saves the HTML battery health file directly inside the local System32
  • System32 Directory Navigation: File Explorer navigation path (This PC > Local Disk (C:) > Windows > System32) to locate system files.
  • Locating Battery Report HTML: Search workflow within System32 to find and launch the generated battery-report.html file in a web browser.
Executing powercfg batteryreport command in Command Prompt by infrareviewer.com
laptop battery health check by infrareviewer.com
Finding generated battery report html file in System32 by infrareviewer.com
Analyzing laptop battery capacity design vs full charge report - infrareviewer.com

Battery Health Report Parameters Description

  • System Product Name: Identifies the official laptop manufacturer and model number assigned to the system hardware.
  • Connected Standby: Indicates whether the system supports low-power modern standby mode for instant wake and background updates.
  • Report Time: Displays the exact timestamp when the Windows battery diagnostic report was generated.
  • Name (Battery Part Number): Shows the specific original equipment manufacturer (OEM) part number for the installed battery module.
  • Manufacturer: Identifies the hardware vendor that produced the internal battery cells (e.g., LGC).
  • Design Capacity: Represents the maximum energy capacity of the battery when it was brand new from the factory (e.g., 50,500 mWh).
  • Full Charge Capacity: Displays the current maximum energy capacity the battery can hold on a 100% charge (e.g., 42,620 mWh).
  • Cycle Count: Indicates the total number of complete charge and discharge cycles the battery has completed (e.g., 676 cycles).

Wi-Fi & Network Stability Test Description

  • Continuous Ping Test (ping google.com -t): Command Prompt command used to send continuous data packets to test real-time internet connectivity and Wi-Fi hardware stability.
  • Request Timed Out (Packet Loss): Indicates a network connection drop or Wi-Fi card hardware failure where data packets fail to reach the destination server.
Testing laptop Wi-Fi network stability and checking packet loss via command prompt - infrareviewer.com

Task Manager Hardware Monitoring Description

  • Task Manager Processes Tab: Live view showing active software applications along with real-time CPU and Memory resource consumption.
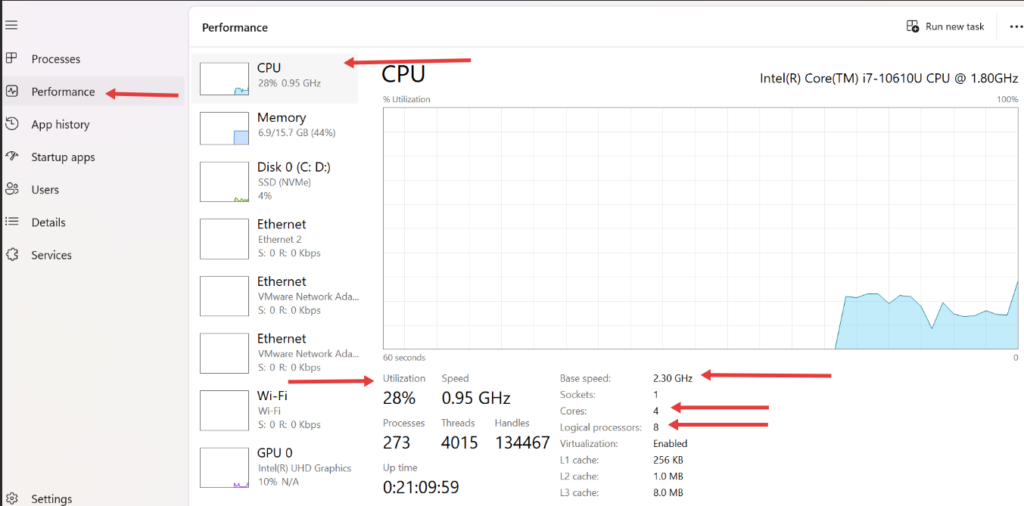
  • CPU Performance Metrics: Detailed breakdown showing utilization percentage, base speed (2.30 GHz), physical cores (4), and logical processors (8).
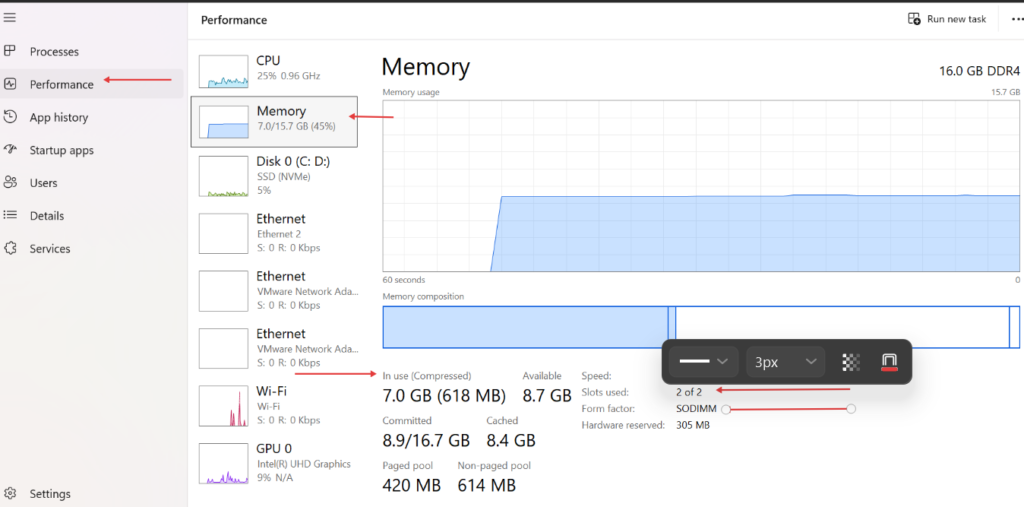
  • RAM Memory Diagnostics: Detailed performance overview displaying total RAM (16 GB DDR4), active usage, memory speed, and populated slots (2 of 2 SODIMM).
Monitoring active processes CPU and memory usage in Task Manager - infrareviewer.com
Checking CPU utilization cores and base speed in Task Manager - infrareviewer.com
Verifying installed RAM speed slots and capacity in Task Manager - infrareviewer.com

HWiNFO Installation & Execution Description

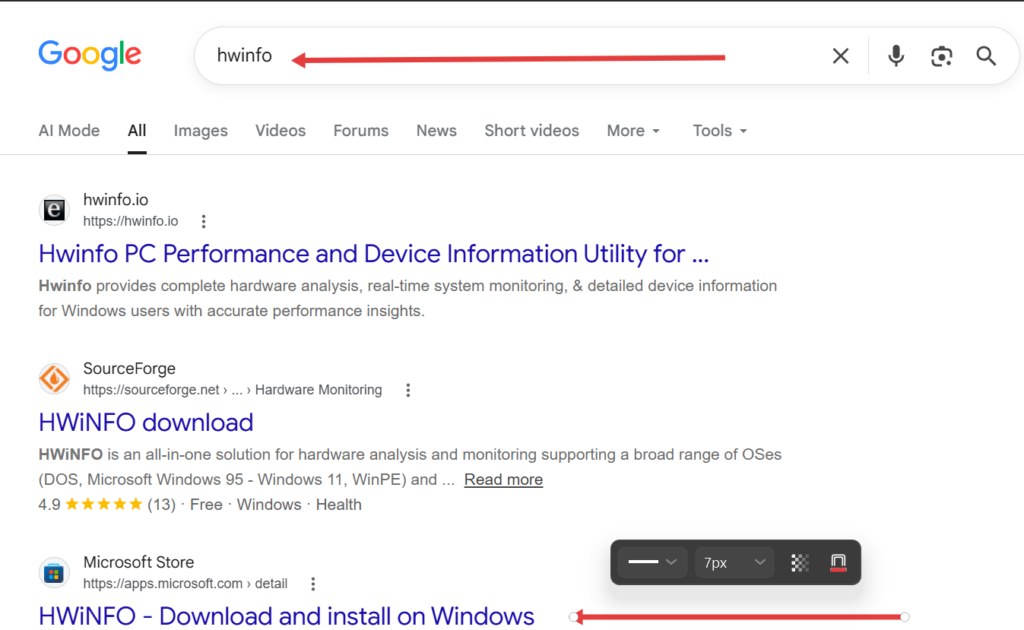
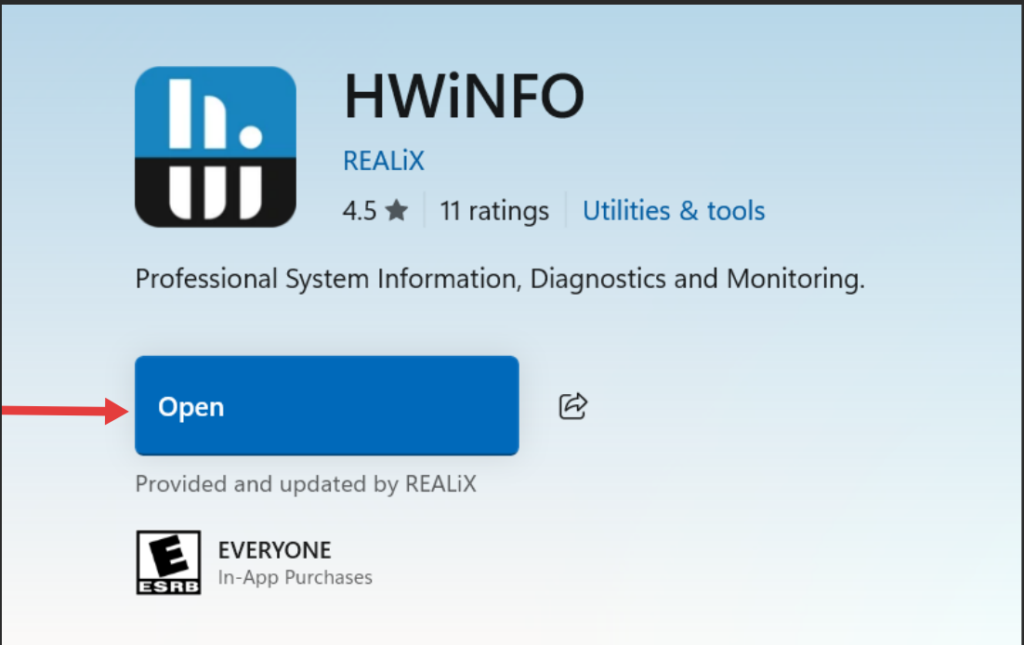
  • Google Search for HWiNFO: Initial search workflow to locate the official HWiNFO diagnostic utility for system hardware monitoring.
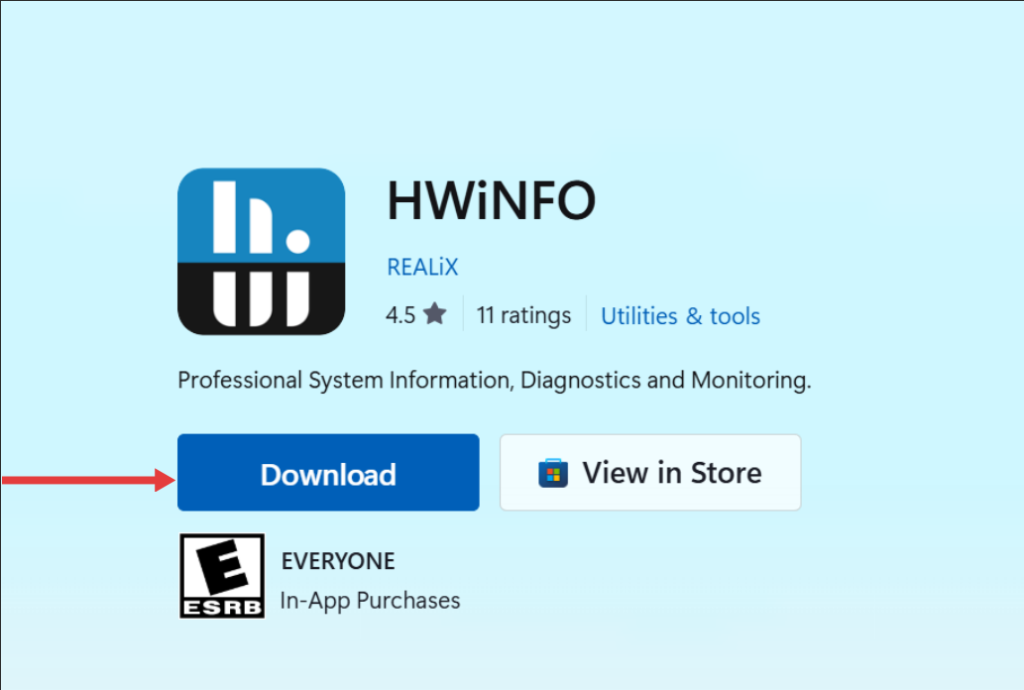
  • Microsoft Store Download Page: Official application page to download and install HWiNFO securely onto Windows.
  • Open App Interface: Launching HWiNFO directly from the Microsoft Store installation prompt.
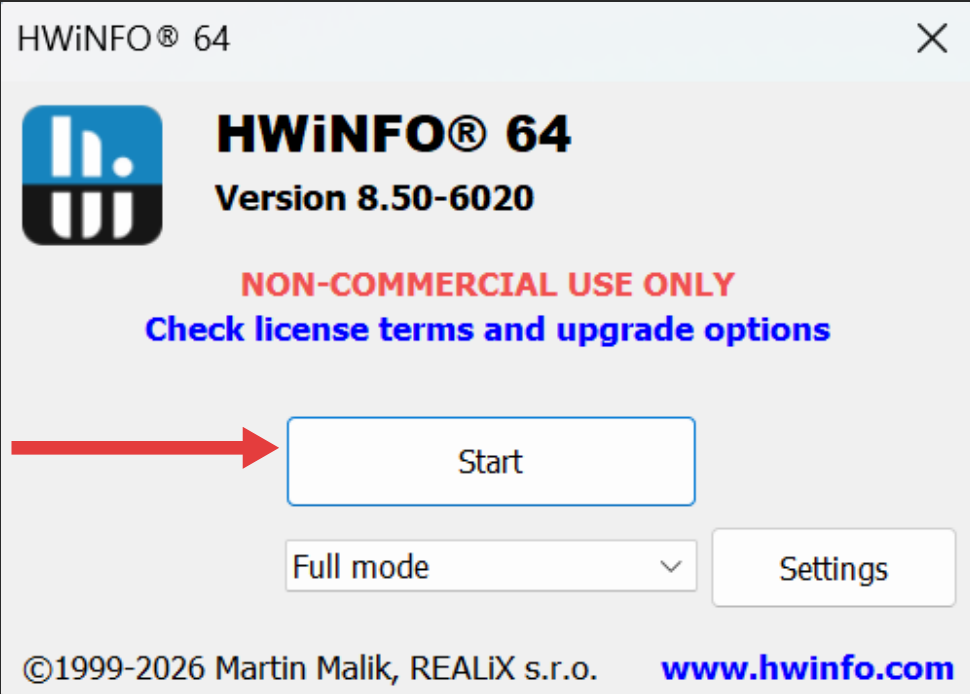
  • HWiNFO Startup Splash Screen: Application initialization screen where clicking “Start” launches full diagnostic mode.
Searching official HWiNFO hardware diagnostic tool online by infrareviewer.com
laptop hardware testing with hwinfo by infrareviewr.com
Opening HWiNFO diagnostic tool after installation - infrareviewer.com
Launching HWiNFO64 in full mode for system analysis by infrareviewer.com

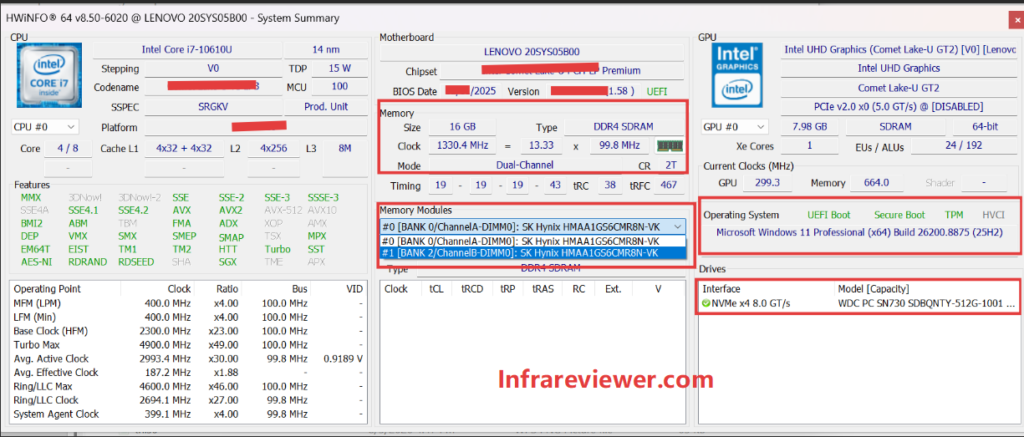
HWiNFO System Summary Detailed Analysis Description

  • Motherboard & BIOS Information: Displays board details along with installed BIOS date, version, and UEFI support mode.
  • Memory & Channel Architecture: Confirms total memory size (16 GB DDR4), clock frequencies, and Dual-Channel operational mode.
  • Memory Modules (Bank Analysis): Shows individual RAM stick information, including slot assignment, manufacturer (SK Hynix), and exact part number.
  • Operating System & Security Specs: Confirms Windows build specs along with active UEFI Boot, Secure Boot, and TPM security status.
  • Storage Interface & SSD Model: Identifies the NVMe PCIe drive interface, official drive model number, and raw storage capacity.
Comprehensive HWiNFO system summary showing RAM SSD and BIOS specs by infrareviewer.com

Final Recommendation

Performing a step-by-step hardware and system diagnostic is the ultimate way to protect your investment before buying a laptop. By verifying both external physical condition and deep internal specifications, you ensure complete value for your money without any hidden surprises.

Leave a Comment

Your email address will not be published. Required fields are marked *